13주차 3교시 — 나만의 파티클 이펙트 실습
강의 아웃라인: week-13-outline 이전 교시: week-13-period2-student (Emitter와 파티클 이펙트)
| 항목 | 내용 |
|---|---|
| 대상 | P5.js 입문자 (테크아트 전공, 1·2교시 Particle·Emitter 학습 완료) |
| 소요 시간 | 45분 (실습) |
- 스타터 코드의 Particle을 확인하고 Emitter를 직접 구현할 수 있습니다
- 마우스·키보드 인터랙션을 연결할 수 있습니다
- 시각 효과를 1개 이상 적용할 수 있습니다
- 결과물을 기말 프로젝트의 시각 모듈로 정리할 수 있습니다
제출·채점하는 과제가 아닌 수업 내 실습입니다. 단계는 서로 독립적이라, 한 단계에서 막혀도 다음 단계로 진행할 수 있습니다.
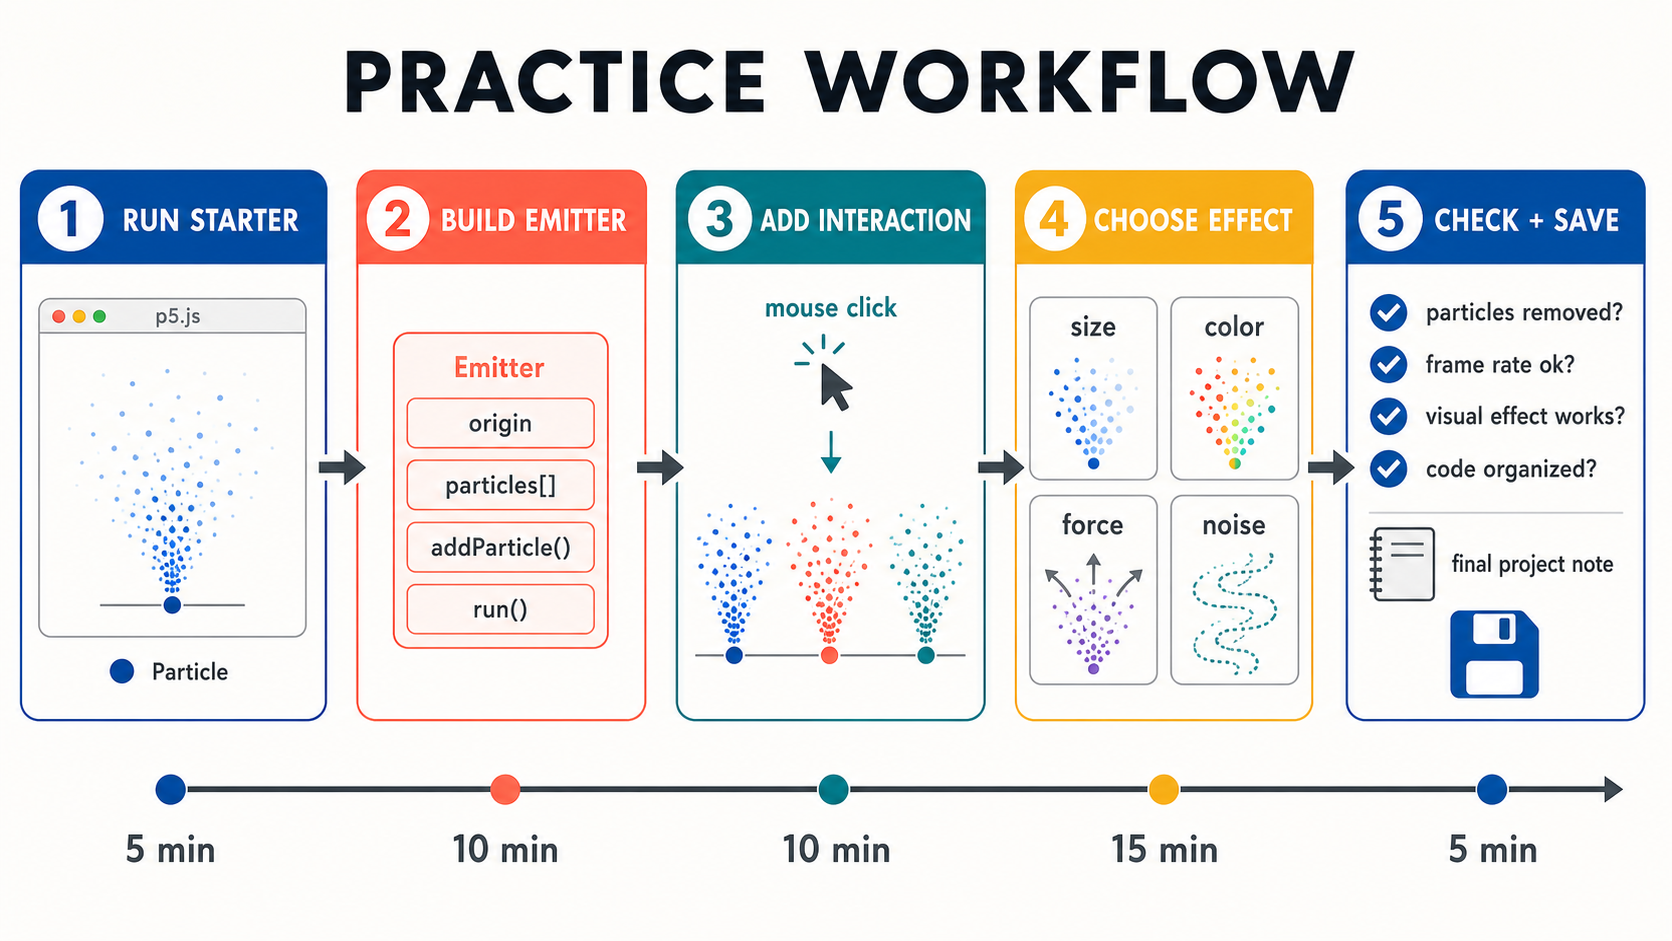
실습 환경 설정
p5.js Web Editor(editor.p5js.org)를 열고, 새 스케치를 만든 다음 기존 코드를 모두 지웁니다. 아래 스타터 코드를 붙여넣고 시작합니다.
스타터 코드는 1교시에서 만든 Particle 클래스와, Emitter 자리를 비워둔 뼈대입니다.
// ============================================
// 13주차 실습: 나만의 파티클 이펙트
// ============================================

// --- Particle 클래스 ---
class Particle {
  constructor(x, y) {
    this.position = createVector(x, y);
    this.velocity = createVector(random(-1, 1), random(-2, 0));
    this.acceleration = createVector(0, 0.05);
    this.lifespan = 255;
  }

  update() {
    this.velocity.add(this.acceleration);
    this.position.add(this.velocity);
    this.lifespan -= 2;
  }

  display() {
    stroke(0, this.lifespan);
    fill(127, this.lifespan);
    ellipse(this.position.x, this.position.y, 12);
  }

  isDead() {
    return this.lifespan < 0;
  }
}

// --- 여기에 Emitter 클래스를 만들어보세요! (단계 2) ---
// class Emitter {
//   ...
// }

// --- 메인 코드 ---
let particles = [];

function setup() {
  createCanvas(640, 360);
}

function draw() {
  background(220);

  // 마우스 위치에서 파티클 생성
  particles.push(new Particle(mouseX, mouseY));

  // 역순 순회로 업데이트 + 표시 + 소멸
  for (let i = particles.length - 1; i >= 0; i--) {
    particles[i].update();
    particles[i].display();
    if (particles[i].isDead()) {
      particles.splice(i, 1);
    }
  }

  // 파티클 수 표시
  fill(0);
  noStroke();
  text("파티클 수: " + particles.length, 10, 20);
}
단계 1 — 스타터 코드 실행 + Particle 구조 확인
목표: 스타터 코드를 실행해 화면이 도는 것을 확인하고, Particle 클래스의 구조를 눈으로 읽습니다.
먼저 로 실행합니다. 마우스를 따라다니는 기본 파티클 시스템이 동작하면 준비 완료입니다.
스타터 코드의 Particle 클래스에서 네 가지를 확인합니다.
- 속성 4개 —
position,velocity,acceleration,lifespan update()— 벡터 물리 업데이트 +lifespan -= 2display()—fill()의 두 번째 인자가lifespan→ 페이드아웃isDead()—lifespan < 0이면 소멸 대상
직접 한 가지를 확인해 봅니다. display()의
fill(127, this.lifespan)에서 this.lifespan을
고정값 255로 바꿔 실행하면, 파티클이 사라질 때 옅어지지
않고 갑자기 사라지는 것을 볼 수 있습니다. 다시
this.lifespan으로 되돌립니다. 이 인자가 페이드아웃을
결정합니다.
- 실행하면 마우스를 따라 회색 파티클이 생성·소멸합니다
- 왼쪽 위에 “파티클 수”가 표시되고 일정 범위에서 유지됩니다
- 콘솔에 에러가 없습니다
단계 2 — Emitter 클래스 구현
목표: draw() 안에 흩어져 있는 파티클
관리 코드를 Emitter 클래스로 정리합니다.
지금은 draw() 안에서 직접 파티클을 push하고, 순회하고,
splice하고 있습니다. 이것을 Emitter 클래스 안으로 옮깁니다.
스타터 코드에서 주석 처리된 Emitter 부분을 아래와 같이 완성합니다.
class Emitter {
  constructor(x, y) {
    this.origin = createVector(x, y);
    this.particles = [];
  }

  addParticle() {
    this.particles.push(new Particle(this.origin.x, this.origin.y));
  }

  run() {
    this.addParticle();

    for (let i = this.particles.length - 1; i >= 0; i--) {
      this.particles[i].update();
      this.particles[i].display();
      if (this.particles[i].isDead()) {
        this.particles.splice(i, 1);
      }
    }
  }
}
그리고 draw()가 Emitter를 사용하도록 바꿉니다.
let emitter;

function setup() {
  createCanvas(640, 360);
  emitter = new Emitter(width / 2, height / 2);
}

function draw() {
  background(220);
  emitter.origin.set(mouseX, mouseY);
  emitter.run();

  fill(0);
  noStroke();
  text("파티클 수: " + emitter.particles.length, 10, 20);
}- 마우스를 움직이면 파티클이 마우스를 따라 생성됩니다 (스타터 코드와 동작 동일)
- 왼쪽 위 “파티클 수”가 약 120~130 근처에서 유지됩니다
- 콘솔에 에러가 없습니다
draw()안에emitter.origin.set(...),emitter.run()이 있고, 기존 for문은 사라졌습니다
Emitter는 세 가지를 가지면 됩니다. ① this.origin —
파티클이 태어나는 위치(createVector) ②
this.particles — 파티클 배열(빈 배열로 시작) ③
run() 메서드 — draw()에 있던 코드를 그대로
옮기되, particles라고 쓰던 것을
this.particles로 바꿉니다.
단계 3 — 인터랙션 연결
목표: 마우스 클릭으로 다중 Emitter를 생성합니다.
지금은 Emitter가 하나뿐입니다. 클릭할 때마다 그 위치에 새 Emitter가 생기도록 만듭니다.
let emitters = [];

function setup() {
  createCanvas(640, 360);
}

function draw() {
  background(220);

  for (let emitter of emitters) {
    emitter.run();
  }

  fill(0);
  noStroke();
  text("클릭으로 파티클 방출 효과를 만들어보세요!", 10, 20);
  text("Emitter 수: " + emitters.length, 10, 40);
}

function mousePressed() {
  emitters.push(new Emitter(mouseX, mouseY));
}- 클릭한 위치마다 파티클 방출 지점이 자리 잡습니다
- “Emitter 수”가 클릭 횟수만큼 증가합니다
- 각 Emitter의 파티클이 계속 생성·소멸합니다
- (
c키 구현 시)c를 누르면 전체가 초기화됩니다
추가 인터랙션 (원하면) - 키보드 c로
모든 Emitter 초기화: if (key === 'c') emitters = []; -
마우스를 드래그하면 연속 생성: mouseDragged() 활용
핵심은 emitter(단수)를 emitters(복수,
배열)로 바꾸는 것입니다. ① let emitters = [];로 선언 ②
mousePressed()에서
emitters.push(new Emitter(mouseX, mouseY)) ③
draw()에서 for...of로 모든 emitter의
run() 호출.
단계 4 — 시각적 효과 추가
목표: 아래 효과 중 최소 하나를 골라 구현합니다. 여러 개를 조합해도 좋습니다.
효과는 하나만 적용해도 단계 4는 완료입니다. 옵션 A는 코드 한 줄만 바꾸면 되므로, 어렵다면 A부터 시작합니다. 시간이 남으면 다른 효과를 추가로 적용합니다.
- 고른 효과가 실행 화면에서 눈에 띄게 나타납니다 (크기·색상·형태·움직임 중 하나 이상)
- 효과 적용 후에도 파티클이 정상 생성·소멸합니다 (콘솔 에러 없음)
옵션 A — 크기 변화: 사라지면서 작아지기
Particle의 display()를 수정합니다.
display() {
  noStroke();
  fill(127, this.lifespan);
  // 수명에 따라 크기 변화 (0~16)
  let size = map(this.lifespan, 0, 255, 0, 16);
  ellipse(this.position.x, this.position.y, size);
}
옵션 B — HSB 색상 변화: 불꽃 효과
setup()에 colorMode(HSB, 255)를 추가하고
Particle의 display()를 수정합니다.
// setup()에 추가
colorMode(HSB, 255);

// Particle의 display()
display() {
  noStroke();
  // Hue: 노랑(40, 갓 태어남) → 빨강(0, 사라짐)
  let hue = map(this.lifespan, 0, 255, 0, 40);
  fill(hue, 255, 255, this.lifespan);
  ellipse(this.position.x, this.position.y, 12);
}HSB 모드를 켜면 background()와 text()의
색상도 HSB 기준으로 바뀝니다. background(0, 0, 220)은
HSB에서 밝은 회색, fill(0, 0, 0)은 검정입니다.
옵션 C — 힘 적용: 바람 불기
Particle에 applyForce() 메서드를 추가하고,
update()에서 가속도를 리셋합니다.
// Particle 클래스에 추가
applyForce(force) {
  this.acceleration.add(force);
}

// update() 수정 — 가속도 리셋 추가
update() {
  this.velocity.add(this.acceleration);
  this.position.add(this.velocity);
  this.acceleration.mult(0); // 리셋!
  this.lifespan -= 2;
}
Emitter의 run() 안에서 중력과 바람을 적용합니다.
run() {
  this.addParticle();

  let gravity = createVector(0, 0.05);
  let wind = createVector(0.03, 0);

  for (let i = this.particles.length - 1; i >= 0; i--) {
    this.particles[i].applyForce(gravity);
    this.particles[i].applyForce(wind);
    this.particles[i].update();
    this.particles[i].display();
    if (this.particles[i].isDead()) {
      this.particles.splice(i, 1);
    }
  }
}
옵션 D — 무지개 파티클: 파티클마다 다른 색상
setup()에 colorMode(HSB, 255)를 추가하고,
Particle을 아래처럼 바꿉니다.
class Particle {
  constructor(x, y) {
    this.position = createVector(x, y);
    this.velocity = createVector(random(-1, 1), random(-2, 0));
    this.acceleration = createVector(0, 0.05);
    this.lifespan = 255;
    // 각 파티클마다 랜덤 Hue
    this.hue = random(255);
  }

  update() {
    this.velocity.add(this.acceleration);
    this.position.add(this.velocity);
    this.lifespan -= 2;
  }

  display() {
    noStroke();
    fill(this.hue, 200, 255, this.lifespan);
    let size = map(this.lifespan, 0, 255, 2, 14);
    ellipse(this.position.x, this.position.y, size);
  }

  isDead() {
    return this.lifespan < 0;
  }
}
옵션 E — 연기 효과: 위로 올라가며 퍼지기
Particle 전체를 아래로 교체합니다. 이 옵션은 기본 RGB 모드에서
동작하므로 colorMode를 따로 켜지 않습니다.
class Particle {
  constructor(x, y) {
    this.position = createVector(x, y);
    // 위로 올라가는 속도
    this.velocity = createVector(random(-0.5, 0.5), random(-2, -0.5));
    this.acceleration = createVector(0, 0);
    this.lifespan = 255;
  }

  update() {
    // 노이즈로 좌우 흔들림 (12주차)
    let xOff = map(noise(this.position.x * 0.01, frameCount * 0.01), 0, 1, -0.1, 0.1);
    this.acceleration.set(xOff, -0.01); // 약간 위로 + 좌우 흔들림

    this.velocity.add(this.acceleration);
    this.velocity.limit(2); // 속도 제한
    this.position.add(this.velocity);
    this.lifespan -= 1.5;
  }

  display() {
    noStroke();
    // 회색 연기 — RGB 그레이스케일
    fill(150, this.lifespan * 0.5);
    let size = map(this.lifespan, 0, 255, 20, 6); // 오래될수록 커짐
    ellipse(this.position.x, this.position.y, size);
  }

  isDead() {
    return this.lifespan < 0;
  }
}
연기는 오래될수록 커지는 것이 포인트입니다.
map(this.lifespan, 0, 255, 20, 6) — lifespan이 줄면 크기가
커집니다(역방향 매핑).
단계 5 — 마무리 자기점검 + 기말 연결 메모
목표: 결과물을 점검하고, 저장하고, 기말 프로젝트와의 연결을 한 줄로 남깁니다.
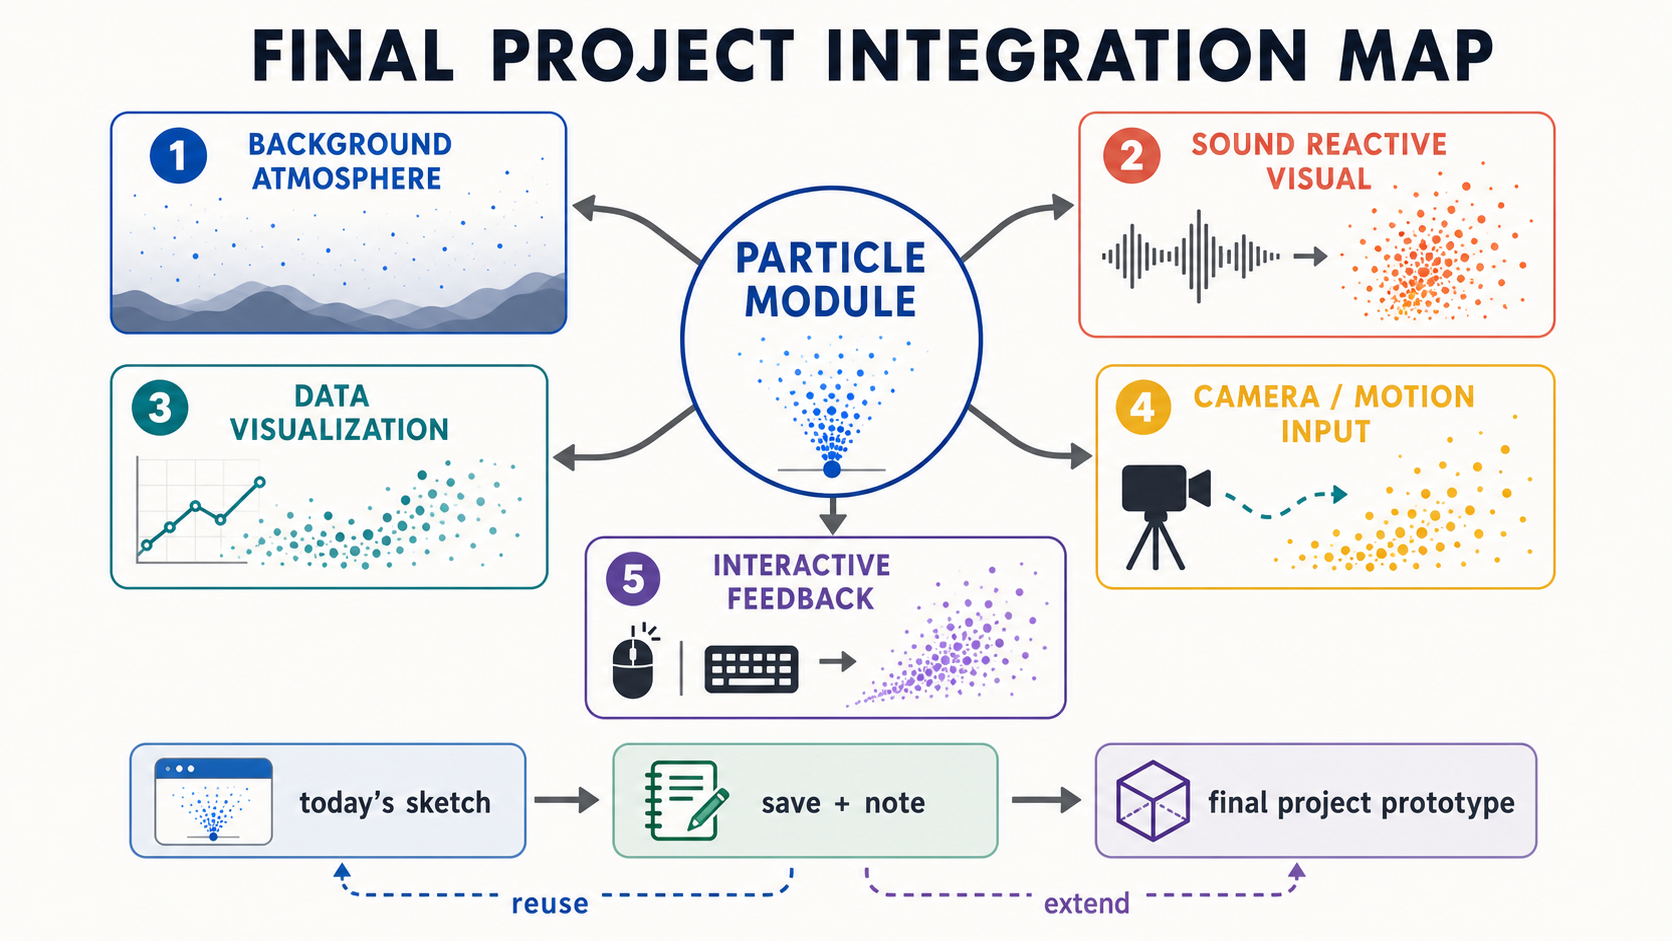
- 아래 체크포인트를 보며 기본 동작을 확인합니다.
- “이 효과를 기말 프로젝트 어디에 쓸 수 있을까?”를 스케치 상단 주석에 한 줄로 적습니다.
- 스케치를 저장하고(Ctrl/Cmd + S), 스케치 이름과 주요 인터랙션을 따로 메모해 둡니다.
체크포인트 - [ ] Particle이 독립적으로 작동하는가?
(생성 → 움직임 → 페이드아웃 → 소멸) - [ ] Emitter가 파티클의 생성과
소멸을 관리하는가? - [ ] splice()로 수명이 끝난 파티클을
역순 순회로 올바르게 제거하는가? - [ ] 마우스 또는 키보드 인터랙션이
동작하는가? - [ ] 시각적 변화(크기 / 색상 / 형태 중 최소 1개)가
적용되었는가? - [ ] 파티클 수가 일정 범위에서 유지되는가? (배열 크기
계속 증가 없음)
오늘 만든 것은 작은 시각 모듈 하나입니다. 기말 프로젝트에서 배경 효과로, 또는 사운드에 반응하는 비주얼의 재료로 그대로 활용할 수 있습니다.
자기점검 기준
제출·채점하지 않는 수업 내 실습입니다. 아래는 스스로 완성도를 가늠하는 기준입니다.
기본 완료 기준 - 스타터 코드의 Particle 동작 확인
(수명, 페이드아웃) - Emitter 클래스 구현 (파티클 생성·관리) -
splice() 역순 순회 패턴 적용 - 인터랙션 요소 1개 이상
확장 기준 - 다중 Emitter 활용 - 2가지 이상의 시각적 변화 적용 - 힘(중력/바람) 또는 노이즈 활용 - 코드 구조가 간결하고 확장 가능함
선택 확장 과제
기본 단계(1~5)를 마친 뒤 더 해보고 싶다면 도전합니다.
- 불꽃놀이 구현 — 아래 전체 코드 참고.
Firework클래스로 2단계 파티클 시스템 만들기 - 마우스 속도 반응 —
dist(mouseX, mouseY, pmouseX, pmouseY)로 마우스 속도를 측정하고, 빠르게 움직일 때 파티클을 더 많이 생성 - Flow Field + 파티클 — 12주차 노이즈로 Flow Field를 만들고, 파티클이 그 흐름을 따라 이동
- 이미지 파티클 —
loadImage()로 작은 이미지를 로드하고,ellipse()대신image()로 표시 (14주차 미리보기) - 반발력 구현 — 마우스 위치에서 파티클을 밀어내는
반발력 (
p5.Vector.sub()로 방향 계산)
불꽃놀이 전체 코드
기존 스케치를 모두 지우고 아래 코드로 교체하면 동작하는 완성 스케치입니다.
// 불꽃놀이 시스템
let fireworks = [];

function setup() {
  createCanvas(640, 360);
  colorMode(HSB, 255);
}

function draw() {
  background(0, 0, 0, 25);

  // 랜덤으로 불꽃놀이 발사
  if (random(1) < 0.05) {
    fireworks.push(new Firework());
  }

  for (let i = fireworks.length - 1; i >= 0; i--) {
    fireworks[i].update();
    fireworks[i].display();
    if (fireworks[i].isDone()) {
      fireworks.splice(i, 1);
    }
  }
}

function mousePressed() {
  fireworks.push(new Firework(mouseX));
}

class Firework {
  constructor(x) {
    this.hue = random(255);
    this.rocket = new Particle(x || random(width), height);
    this.rocket.velocity = createVector(random(-2, 2), random(-12, -8));
    this.exploded = false;
    this.fragments = [];
  }

  update() {
    if (!this.exploded) {
      this.rocket.applyForce(createVector(0, 0.15));
      this.rocket.update();

      if (this.rocket.velocity.y >= 0) {
        this.explode();
      }
    }

    for (let i = this.fragments.length - 1; i >= 0; i--) {
      this.fragments[i].applyForce(createVector(0, 0.05));
      this.fragments[i].update();
      if (this.fragments[i].isDead()) {
        this.fragments.splice(i, 1);
      }
    }
  }

  explode() {
    this.exploded = true;
    for (let i = 0; i < 40; i++) {
      let f = new Particle(this.rocket.position.x, this.rocket.position.y);
      f.velocity = p5.Vector.random2D().mult(random(2, 7));
      f.hue = this.hue;
      this.fragments.push(f);
    }
  }

  display() {
    if (!this.exploded) {
      // 발사체: 흰색 점
      push();
      noStroke();
      fill(0, 0, 255);
      ellipse(this.rocket.position.x, this.rocket.position.y, 4);
      pop();
    }

    for (let f of this.fragments) {
      push();
      noStroke();
      fill(f.hue, 255, 255, f.lifespan);
      let size = map(f.lifespan, 0, 255, 0, 6);
      ellipse(f.position.x, f.position.y, size);
      pop();
    }
  }

  isDone() {
    return this.exploded && this.fragments.length === 0;
  }
}

class Particle {
  constructor(x, y) {
    this.position = createVector(x, y);
    this.velocity = createVector(0, 0);
    this.acceleration = createVector(0, 0);
    this.lifespan = 255;
    this.hue = 0;
  }

  applyForce(force) {
    this.acceleration.add(force);
  }

  update() {
    this.velocity.add(this.acceleration);
    this.position.add(this.velocity);
    this.acceleration.mult(0);
    this.lifespan -= 4;
  }

  isDead() {
    return this.lifespan < 0;
  }
}
완성 예제
단계 1~4를 모두 완료한 예시입니다. 다중 Emitter + HSB 색상 변화 + 크기 변화를 적용한 버전입니다.
// ============================================
// 13주차 실습 완성 예제
// 다중 Emitter + HSB 색상 + 크기 변화
// ============================================

let emitters = [];

function setup() {
  createCanvas(640, 360);
  colorMode(HSB, 255);
}

function draw() {
  background(0, 0, 30, 40);

  for (let emitter of emitters) {
    emitter.run();
  }

  // 안내 텍스트
  fill(0, 0, 255);
  noStroke();
  text("클릭: 파티클 방출 효과 생성 | 드래그: 연속 생성 | 'c': 초기화", 10, 20);

  let totalParticles = 0;
  for (let e of emitters) {
    totalParticles += e.particles.length;
  }
  text("Emitter: " + emitters.length + " | 파티클: " + totalParticles, 10, 40);
}

function mousePressed() {
  emitters.push(new Emitter(mouseX, mouseY));
}

function mouseDragged() {
  // 드래그하면 연속으로 Emitter 생성 (5프레임마다)
  if (frameCount % 5 === 0) {
    emitters.push(new Emitter(mouseX, mouseY));
  }
}

function keyPressed() {
  if (key === 'c' || key === 'C') {
    emitters = [];
  }
}

// --- Particle 클래스 ---
class Particle {
  constructor(x, y, hue) {
    this.position = createVector(x, y);
    this.velocity = createVector(random(-1.5, 1.5), random(-2.5, -0.5));
    this.acceleration = createVector(0, 0);
    this.lifespan = 255;
    this.hue = hue;
  }

  applyForce(force) {
    this.acceleration.add(force);
  }

  update() {
    this.velocity.add(this.acceleration);
    this.position.add(this.velocity);
    this.acceleration.mult(0);
    this.lifespan -= 2;
  }

  display() {
    noStroke();
    // 기본 Hue에서 약간 변화하며 사라짐
    let h = (this.hue + map(this.lifespan, 0, 255, 30, 0)) % 255;
    fill(h, 220, 255, this.lifespan);
    // 수명에 따라 크기 변화
    let size = map(this.lifespan, 0, 255, 1, 14);
    ellipse(this.position.x, this.position.y, size);
  }

  isDead() {
    return this.lifespan < 0;
  }
}

// --- Emitter 클래스 ---
class Emitter {
  constructor(x, y) {
    this.origin = createVector(x, y);
    this.particles = [];
    this.hue = random(255); // 각 Emitter마다 고유 색상
  }

  addParticle() {
    this.particles.push(
      new Particle(this.origin.x, this.origin.y, this.hue)
    );
  }

  run() {
    this.addParticle();

    let gravity = createVector(0, 0.05);

    for (let i = this.particles.length - 1; i >= 0; i--) {
      this.particles[i].applyForce(gravity);
      this.particles[i].update();
      this.particles[i].display();

      if (this.particles[i].isDead()) {
        this.particles.splice(i, 1);
      }
    }
  }
}
실행 결과 - 화면을 클릭하면 그 위치에 고유한 색상의
파티클 방출 효과가 생성됨 - 파티클이 중력으로 떨어지며 크기와 투명도가
점점 줄어듦 - 색상이 Hue 축을 따라 자연스럽게 변하며 사라짐 - 드래그하면
연속으로 Emitter가 배치되어 파티클 라인이 형성됨 - c 키로
전체 초기화 가능