9주차 3교시 — 학생 주도 실습: 벡터를 활용한 움직임 작품
강의 아웃라인: week-09-outline 이전 교시: week-09-period2-student (가속도, 삼각함수, 클래스 결합) 다음 주차: week-10-outline (힘과 물리)
| 항목 | 내용 |
|---|---|
| 대상 | p5.js 입문자 (테크아트 전공) |
| 소요 시간 | 45분 |
| 사전 준비 | 1교시 벡터 기본, 2교시 가속도·삼각함수·Mover 클래스 |
| 결과물 | 벡터·클래스·배열 기반 움직임 작품 1점 |
-
p5.Vector와 벡터 연산을 사용하여 자연스러운 움직임을 구현합니다 - 7주차 클래스/배열 패턴을 벡터 기반으로 확장하여 다수의 객체가 움직이는 작품을 제작합니다
실습 환경 설정
p5.js Web Editor(editor.p5js.org)에서 새 스케치를 만듭니다.
스타터 코드
기본 구조:
class Mover {
  constructor(x, y) {
    this.pos = createVector(x, y);
    this.vel = createVector(random(-2, 2), random(-2, 2));
    this.acc = createVector(0, 0);
    this.r = 15;
  }

  update() {
    this.vel.add(this.acc);
    this.pos.add(this.vel);
    this.acc.mult(0);
  }

  display() {
    fill(127);
    noStroke();
    ellipse(this.pos.x, this.pos.y, this.r * 2);
  }

  edges() {
    if (this.pos.x > width) this.pos.x = 0;
    if (this.pos.x < 0) this.pos.x = width;
    if (this.pos.y > height) this.pos.y = 0;
    if (this.pos.y < 0) this.pos.y = height;
  }
}

let movers = [];

function setup() {
  createCanvas(400, 400);
  for (let i = 0; i < 10; i++) {
    movers.push(new Mover(random(width), random(height)));
  }
}

function draw() {
  background(220);
  for (let m of movers) {
    m.update();
    m.edges();
    m.display();
  }
}
기본 동작: 10개의 회색 원이 무작위 방향으로 등속 이동.
Step 1 — Mover 클래스 작성 및 동작 확인
목표: 벡터 기반 Mover 클래스를 작성하고, 1개의 객체가 화면에서 움직이는 것을 확인한다.
방향 A: 벡터 바운싱 월드
5주차 바운싱을 벡터 + 클래스로 구현.
작성할 코드:
class Mover {
  constructor(x, y) {
    this.pos = createVector(x, y);
    this.vel = createVector(random(-3, 3), random(-3, 3));
    this.acc = createVector(0, 0);
    this.r = random(10, 25);
    this.c = color(random(100, 255), random(100, 255), random(255));
  }

  update() {
    this.vel.add(this.acc);
    this.pos.add(this.vel);
    this.acc.mult(0);
  }

  display() {
    fill(this.c);
    noStroke();
    ellipse(this.pos.x, this.pos.y, this.r * 2);
  }

  edges() {
    if (this.pos.x > width - this.r || this.pos.x < this.r) {
      this.vel.x *= -1;
    }
    if (this.pos.y > height - this.r || this.pos.y < this.r) {
      this.vel.y *= -1;
    }
  }
}
7주차 Ball 클래스의 bounce()와 같은 논리를 벡터로 작성한
구조입니다.
방향 B: 마우스 추적 Mover
마우스를 향해 가속하는 Mover입니다.
작성할 코드 (추가할 메서드):
class Mover {
  constructor(x, y) {
    this.pos = createVector(x, y);
    this.vel = createVector(0, 0);
    this.acc = createVector(0, 0);
    this.r = random(5, 12);
    this.c = color(random(100, 255), random(100, 200), random(200, 255));
  }

  seekMouse() {
    let mouse = createVector(mouseX, mouseY);
    let dir = p5.Vector.sub(mouse, this.pos);
    dir.normalize();
    dir.mult(0.3);
    this.acc = dir;
  }

  update() {
    this.vel.add(this.acc);
    this.pos.add(this.vel);
    this.vel.mult(0.98);   // 마찰
    this.acc.mult(0);
  }

  display() {
    fill(this.c);
    noStroke();
    ellipse(this.pos.x, this.pos.y, this.r * 2);
  }
}
seekMouse() 패턴: sub()로 방향 →
normalize()로 크기 1 → mult(0.3)로 가속 크기
조절.
방향 C: 삼각함수 궤도 Mover
sin/cos로 원운동하는 Mover입니다.
작성할 코드:
class OrbitalMover {
  constructor(cx, cy, r, speed) {
    this.center = createVector(cx, cy);  // 궤도 중심
    this.r = r;                           // 궤도 반지름
    this.angle = random(TWO_PI);          // 시작 각도
    this.speed = speed;                   // 회전 속도
    this.pos = createVector(0, 0);
    this.size = random(5, 15);
    this.c = color(random(150, 255), random(100, 200), random(200, 255));
  }

  update() {
    this.angle += this.speed;
    this.pos.x = cos(this.angle) * this.r + this.center.x;
    this.pos.y = sin(this.angle) * this.r + this.center.y;
  }

  display() {
    fill(this.c);
    noStroke();
    ellipse(this.pos.x, this.pos.y, this.size);
  }
}
원운동 공식: cos(angle) * r + cx,
sin(angle) * r + cy.
예상 결과: 방향에 따라 1개의 객체가 화면에서 움직이는 것을 확인
createVector()는setup()또는 클래스의constructor()안에서 호출.- 클래스 안에서는
this.pos,this.vel처럼this를 붙인다. - 배열로 늘리기 전에 객체 1개부터 확인.
Step 2 — 배열로 확장
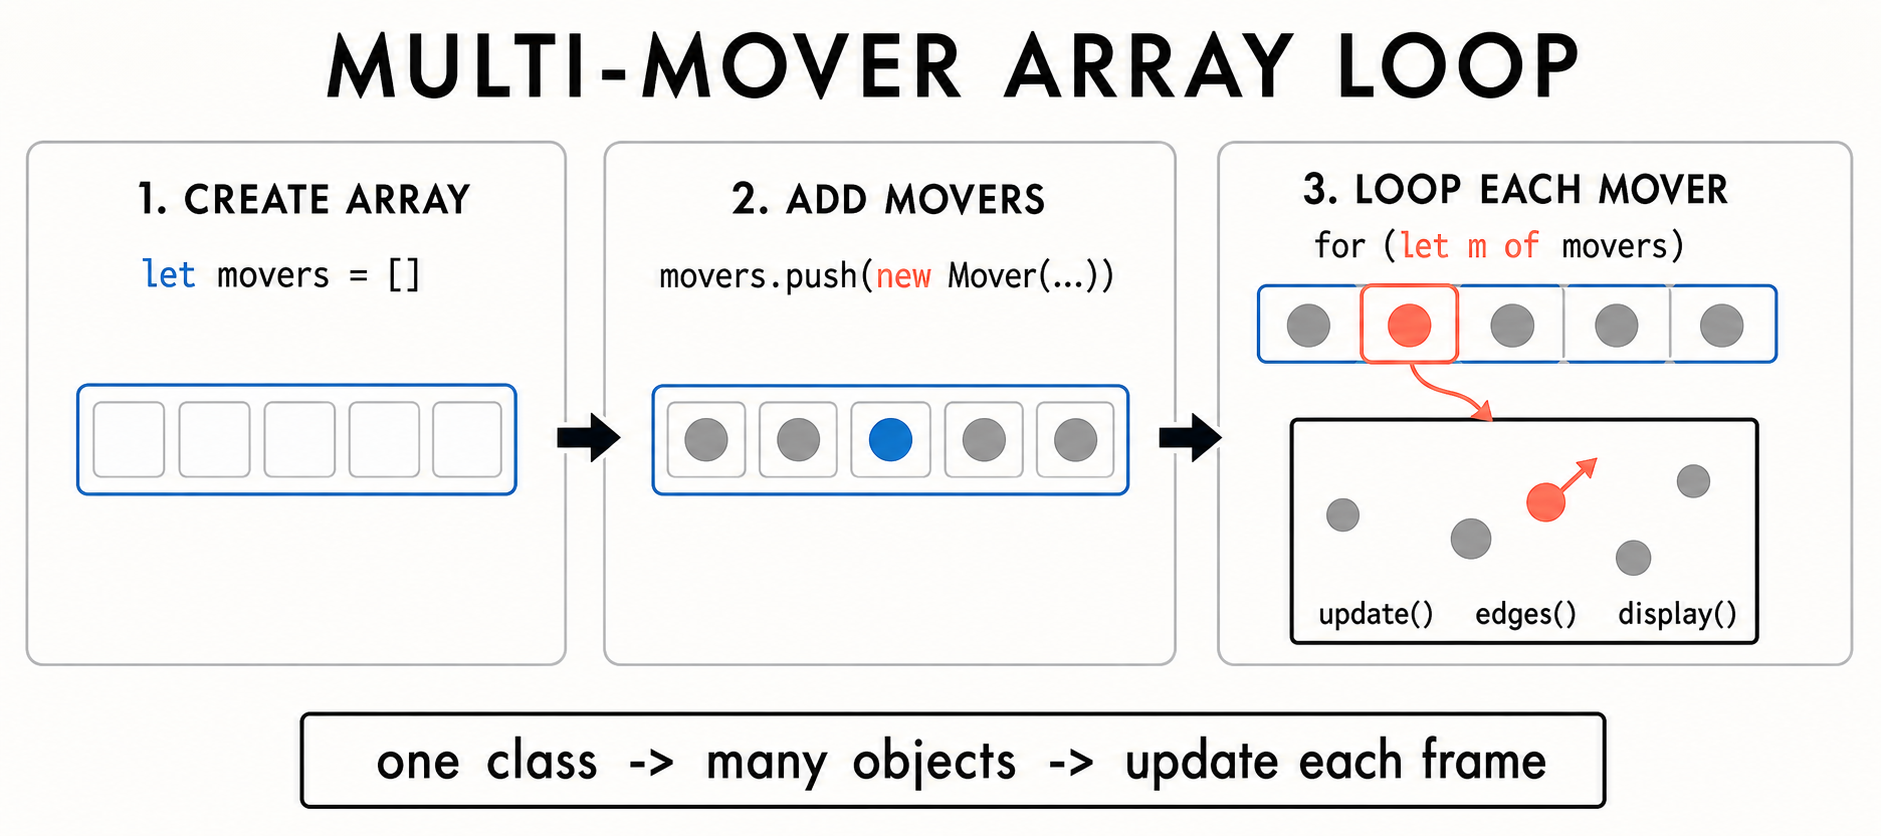
목표: 5개 이상의 Mover 객체를 배열로 관리하고, 각각 독립적으로 움직이게 한다.
가이드:
let movers = [];

function setup() {
  createCanvas(400, 400);
  for (let i = 0; i < 10; i++) {
    movers.push(new Mover(random(width), random(height)));
  }
}

function draw() {
  background(220);
  for (let m of movers) {
    // 방향 B의 경우:
    // m.seekMouse();
    m.update();
    m.edges();    // 방향 A만 해당
    m.display();
  }
}
7주차에서 했던 push(new Mover(...)) →
for...of 순회와 같은 패턴입니다.
방향 C의 경우 (궤도 Mover):
let orbiters = [];

function setup() {
  createCanvas(400, 400);
  for (let i = 0; i < 8; i++) {
    let r = 50 + i * 20;          // 반지름을 점점 크게
    let speed = 0.02 - i * 0.002; // 바깥일수록 느리게
    orbiters.push(new OrbitalMover(200, 200, r, speed));
  }
}

function draw() {
  background(0, 0, 0, 30);  // 잔상 효과
  for (let o of orbiters) {
    o.update();
    o.display();
  }
}
반지름을 다르게 설정하면 태양계처럼 여러 궤도에서 도는 점들이 생깁니다.
예상 결과: 다수의 객체가 각각 독립적으로 움직이는 장면
let movers = [];는setup()밖에 선언.movers.push(new Mover(...))로 객체 추가.for (let m of movers)로 순회.- 방향 C의
createVector()는setup()안이나constructor()안에서 호출.
Step 3 — 시각 효과 및 인터랙션 추가
목표: 색상, 크기 변화, 잔상 효과, 인터랙션 중 1개 이상을 추가한다.
색상 효과
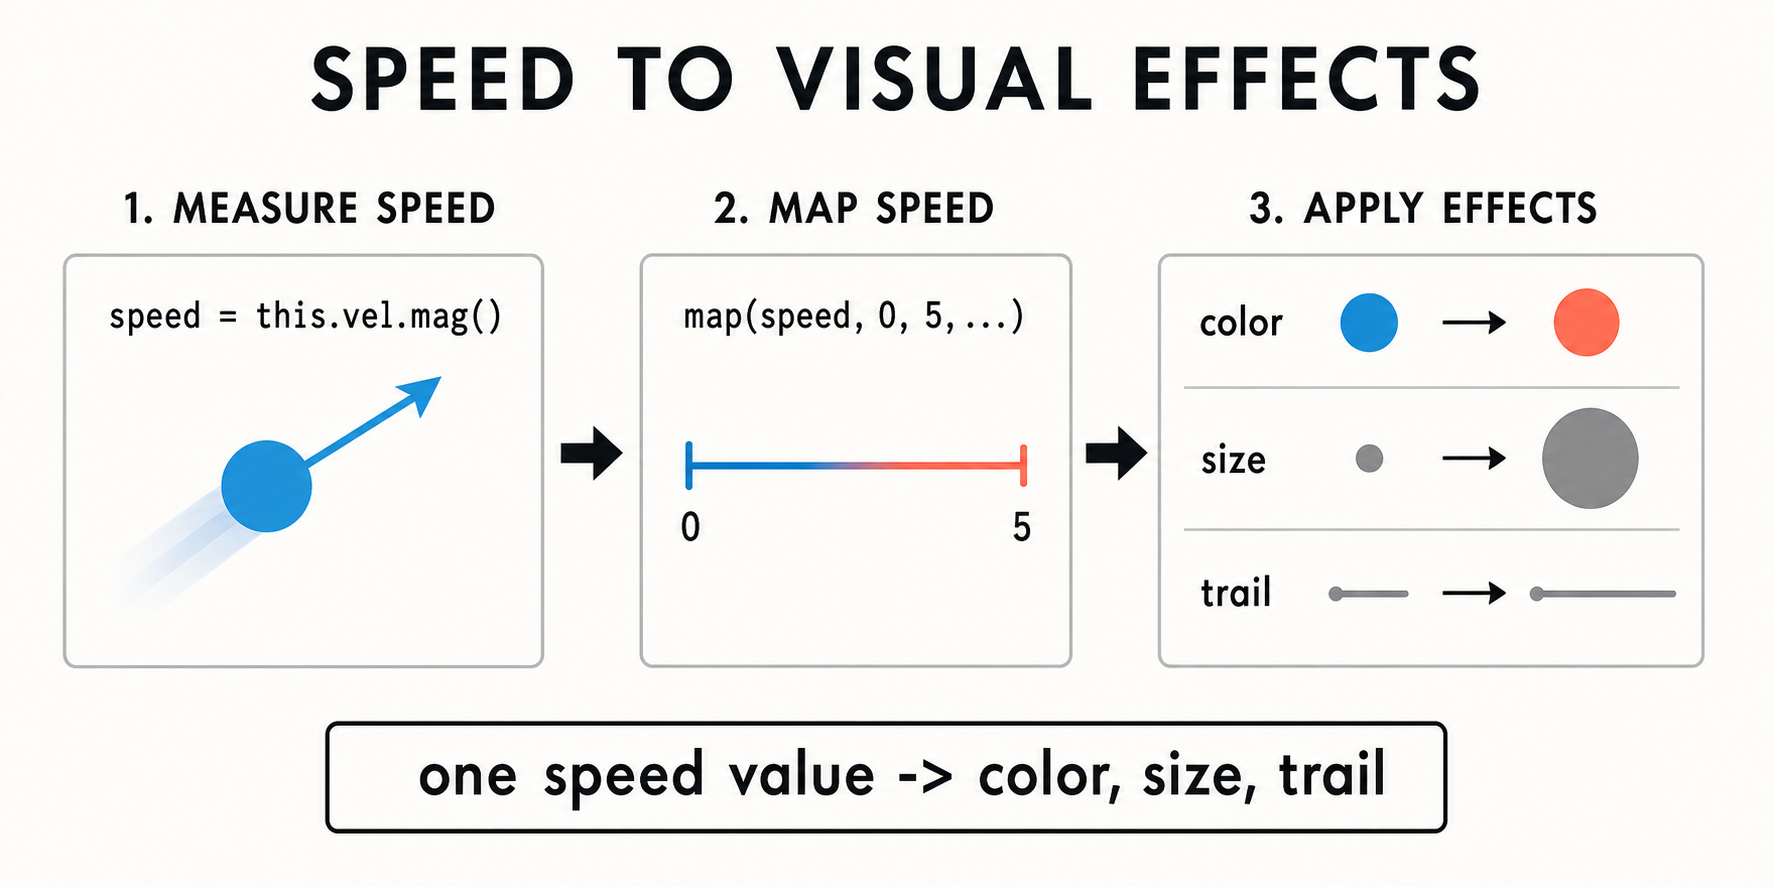
속도에 따른 색상 변화 (HSB 모드):
// setup() 안에 추가
colorMode(HSB, 360, 100, 100, 100);

// display() 메서드 수정
display() {
  let speed = this.vel.mag();  // 속도의 크기
  let hue = map(speed, 0, 5, 180, 360);  // 느리면 파랑, 빠르면 빨강
  fill(hue, 80, 100);
  noStroke();
  ellipse(this.pos.x, this.pos.y, this.r * 2);
}this.vel.mag()은 1교시에서 배운 벡터의 크기라서, 속도가
빠를수록 다른 색상이 나옵니다.
크기 효과
속도에 비례한 크기 변화:
display() {
  let speed = this.vel.mag();
  let size = map(speed, 0, 5, 5, 30);
  fill(this.c);
  noStroke();
  ellipse(this.pos.x, this.pos.y, size);
}
잔상 효과
function draw() {
  // background(220);  // 이 줄을 아래로 교체
  background(0, 0, 0, 30);  // 반투명 배경 → 잔상

  for (let m of movers) {
    m.update();
    m.edges();
    m.display();
  }
}
5주차에서 배운 잔상 효과입니다. background()의 네 번째
값(alpha)이 작을수록 잔상이 오래 남습니다.
인터랙션 — 클릭으로 객체 추가
function mousePressed() {
  movers.push(new Mover(mouseX, mouseY));
}
4주차, 6주차, 7주차 내용을 조합하면 클릭할 때마다 마우스 위치에 새 Mover가 생깁니다.
인터랙션 — 키보드로 속도에 순간 변화(impulse) 주기
function keyPressed() {
  let impulse = createVector(0, 0);
  if (key === 'w') impulse = createVector(0, -2);
  if (key === 's') impulse = createVector(0, 2);
  if (key === 'a') impulse = createVector(-2, 0);
  if (key === 'd') impulse = createVector(2, 0);

  for (let m of movers) {
    m.vel.add(impulse);  // 속도에 직접 순간 변화를 더함
  }
}
WASD 키를 누르면 모든 공의 vel에 한 번의 속도 변화가
더해집니다.
예상 결과: 시각적으로 풍부하고, 사용자 입력에 반응하는 작품
- HSB 색상 모드를 쓰려면
setup()안에colorMode(HSB, 360, 100, 100, 100);추가. - 잔상 효과는
background(r, g, b, alpha)— alpha가 작을수록 잔상이 오래 남습니다. RGB 모드에서는background(0, 30), HSB 모드에서는background(0, 0, 0, 30). mousePressed()함수는 클래스 밖,setup()/draw()와 같은 레벨에 작성.
Step 4 — 선택 확장
확장 1: 중력 추가
// update() 메서드에서 또는 draw()에서
// 매 프레임 아래로 가속
update() {
  let gravity = createVector(0, 0.1);
  this.acc.add(gravity);
  this.vel.add(this.acc);
  this.pos.add(this.vel);
  this.acc.mult(0);
}
확장 2: sin으로 크기 진동
display() {
  let oscillatingSize = this.r + sin(frameCount * 0.1) * 5;
  fill(this.c);
  noStroke();
  ellipse(this.pos.x, this.pos.y, oscillatingSize * 2);
}
sin()으로 크기를 주기적으로 변화시킵니다.
확장 3: 속도 제한
(limit())
update() {
  this.vel.add(this.acc);
  this.vel.limit(5);  // 최대 속도 5로 제한
  this.pos.add(this.vel);
  this.acc.mult(0);
}vel.limit(5)는 최대 속도를 5로 제한합니다.
확장 4: 방향에 따라 회전하는 삼각형
display() {
  push();
  translate(this.pos.x, this.pos.y);
  rotate(this.vel.heading());  // 속도 방향으로 회전
  fill(this.c);
  noStroke();
  triangle(-this.r, -this.r / 2, -this.r, this.r / 2, this.r, 0);
  pop();
}vel.heading()은 속도 벡터의 각도이며,
rotate()와 결합하면 이동 방향을 바라보는 삼각형을 만들 수
있습니다.
완성 예시
방향 A: 벡터 바운싱 월드
class Mover {
  constructor(x, y) {
    this.pos = createVector(x, y);
    this.vel = createVector(random(-3, 3), random(-3, 3));
    this.acc = createVector(0, 0);
    this.r = random(10, 25);
    this.c = color(random(100, 255), random(100, 255), random(255), 200);
  }

  update() {
    this.vel.add(this.acc);
    this.pos.add(this.vel);
    this.acc.mult(0);
  }

  display() {
    fill(this.c);
    noStroke();
    ellipse(this.pos.x, this.pos.y, this.r * 2);
  }

  edges() {
    if (this.pos.x > width - this.r) {
      this.pos.x = width - this.r;
      this.vel.x *= -1;
    }
    if (this.pos.x < this.r) {
      this.pos.x = this.r;
      this.vel.x *= -1;
    }
    if (this.pos.y > height - this.r) {
      this.pos.y = height - this.r;
      this.vel.y *= -1;
    }
    if (this.pos.y < this.r) {
      this.pos.y = this.r;
      this.vel.y *= -1;
    }
  }
}

let movers = [];

function setup() {
  createCanvas(400, 400);
  for (let i = 0; i < 20; i++) {
    movers.push(new Mover(random(width), random(height)));
  }
}

function draw() {
  background(240);
  for (let m of movers) {
    m.update();
    m.edges();
    m.display();
  }
}

function mousePressed() {
  movers.push(new Mover(mouseX, mouseY));
}
실행 결과: - 20개의 다양한 크기/색상의 원이 벽에 튕기며 이동함 - 클릭할 때마다 마우스 위치에 새 원 추가
방향 B: 마우스 추적 파티클
class Mover {
  constructor(x, y) {
    this.pos = createVector(x, y);
    this.vel = createVector(random(-1, 1), random(-1, 1));
    this.acc = createVector(0, 0);
    this.r = random(3, 10);
    this.c = color(random(150, 255), random(100, 200), random(200, 255));
  }

  seekMouse() {
    let mouse = createVector(mouseX, mouseY);
    let dir = p5.Vector.sub(mouse, this.pos);
    dir.normalize();
    dir.mult(0.3);
    this.acc = dir;
  }

  update() {
    this.vel.add(this.acc);
    this.vel.limit(6);      // 최대 속도 제한
    this.pos.add(this.vel);
    this.vel.mult(0.98);    // 마찰
    this.acc.mult(0);
  }

  display() {
    let speed = this.vel.mag();
    let alpha = map(speed, 0, 6, 50, 255);
    fill(red(this.c), green(this.c), blue(this.c), alpha);
    noStroke();
    ellipse(this.pos.x, this.pos.y, this.r * 2);
  }
}

let movers = [];

function setup() {
  createCanvas(400, 400);
  for (let i = 0; i < 30; i++) {
    movers.push(new Mover(random(width), random(height)));
  }
}

function draw() {
  background(0, 0, 0, 30);  // 잔상 효과
  for (let m of movers) {
    m.seekMouse();
    m.update();
    m.display();
  }
}

function mousePressed() {
  for (let i = 0; i < 5; i++) {
    movers.push(new Mover(mouseX + random(-20, 20), mouseY + random(-20, 20)));
  }
}
실행 결과: - 30개의 점이 마우스 방향으로 이동함 - 잔상 효과로 궤적이 보임 - 빠르면 밝고, 느리면 투명 - 클릭할 때마다 5개씩 추가됨
방향 C: 삼각함수 궤도 아트
class OrbitalMover {
  constructor(cx, cy, r, speed) {
    this.center = createVector(cx, cy);
    this.r = r;
    this.angle = random(TWO_PI);
    this.speed = speed;
    this.pos = createVector(0, 0);
    this.size = map(r, 30, 180, 3, 12);
    this.hue = map(r, 30, 180, 0, 300);
  }

  update() {
    this.angle += this.speed;
    this.pos.x = cos(this.angle) * this.r + this.center.x;
    this.pos.y = sin(this.angle) * this.r + this.center.y;
  }

  display() {
    fill(this.hue, 80, 100, 60);
    noStroke();
    ellipse(this.pos.x, this.pos.y, this.size);
  }
}

let orbiters = [];

function setup() {
  createCanvas(400, 400);
  colorMode(HSB, 360, 100, 100, 100);

  for (let i = 0; i < 12; i++) {
    let r = 30 + i * 15;
    let speed = 0.03 - i * 0.002;
    orbiters.push(new OrbitalMover(200, 200, r, speed));
  }
}

function draw() {
  background(0, 0, 10, 8);  // 잔상 효과
  for (let o of orbiters) {
    o.update();
    o.display();
  }
}

function mousePressed() {
  // 클릭하면 마우스 위치를 중심으로 새 궤도 추가
  let r = random(20, 80);
  let speed = random(0.01, 0.05);
  orbiters.push(new OrbitalMover(mouseX, mouseY, r, speed));
}
실행 결과: - 12개의 점이 중앙을 중심으로 각각 다른 반지름/속도로 원운동 - 잔상 효과로 궤적의 시각적 패턴이 형성됨 - 안쪽 궤도는 빠르고 작은 점, 바깥 궤도는 느리고 큰 점 - 클릭하면 마우스 위치에 새 궤도 추가
마무리 체크
| 개념 | 핵심 | 코드 |
|---|---|---|
| 벡터 | x, y를 하나로 묶음 | createVector(x, y) |
| 움직임 | 위치 + 속도 | pos.add(vel) |
| 가속 | 속도 + 가속도 | vel.add(acc) → pos.add(vel) |
| 원운동 | sin + cos | cos(angle) * r, sin(angle) * r |
| Mover 클래스 | 7주차 클래스의 벡터 업그레이드 | this.pos, this.vel,
this.acc |
pos.add(vel) = 움직임, vel.add(acc)
= 자연스러운 가속.
작업 후 Ctrl+S 또는 Cmd+S로 저장합니다.